Showing posts with label Pie. Show all posts

Wednesday, March 14, 2018

Happy Pi(e) Day! Easy Banana Cream Pie

3.14.... Pi(e) day! 

How fun to have a specific day to make and eat pie. Or just eat pie, whichever you prefer.  Pi(e) day falls on one of my favorite days of the year... my mom's birthday! Not only do I get to celebrate the day with pie, I also get to celebrate my mom! 

My husband doesn't like cake. But, he does like pie. I told him I was making this pie for Pi(e) day, and his response was: "Couldn't you choose a better pie to make?" Needless to say, his favorite pie is not Banana Cream. 

*Update: I asked him what kind of pie he would like, and he said, "Shepherds Pie." Definitely not on the same page.


I chose Banana Cream for two reasons:
1. It's SO SIMPLE. This Mama of a 1 year old needs every extra minute to make sure she isn't tearing the house apart. Although old-fashioned Banana Cream Pie is very delicious, I have no time to make my own pudding or pie shell. Nope. 

2. Spring!! Is it just me, or does Banana Cream remind anyone else of spring? Finally the weather is starting to get nicer and the refreshing taste of banana is a nice break from the ginger, cranberry, and apple flavors that fall and winter have (although all those flavors are wonderful!).

I tried to make this as easy as possible. I only had about 15 minutes left in my little girl's nap. I took a pre-made graham cracker shell from the store. I chose the smaller size since I knew I would be the only one eating it :)
This is the part where my Mom would roll her eyes. She's a "make it yourself" pie crust maker, and they always taste so good... but I had no time... Sorry Mom!

What You'll Need:
- One Pre-made pie shell from the store. Or, you can make your own.
- Two bananas
- One package vanilla pudding mix
- One container of whipped topping, or 1 cup whipping cream to whip yourself (will whip into more than 1 cup)
-Vanilla Wafer cookies

.
.
.
.
.

Cut up the two bananas into slices. Lay slices on the bottom of pie shell. If you get the smaller shell, you'll only need about one banana sliced. 

Crush up some Vanilla Wafer cookies (I used 5). Sprinkle on top of the banana slices. Add more or less, depending on your preference!

Make pudding according to package instructions. I used vanilla pudding rather than Banana flavor. As much as I like Banana Cream... I don't want it to have an overly banana flavor. Plus, the banana slices at the bottom add just enough banana flavor that it doesn't over power. Once your pudding has set, fold in a cup of the whipped topping. 
*If you make your own whipped topping, be sure you DON'T over whip it. That will turn it into a butter-like stiffness. Not good in a Banana Cream Pie ;)

Once the pudding and the whipped topping is combined, fill in over the bananas and wafer cookies. Let this set for about 2 hours in the refrigerator. 

 Once the pie has set, remove from the refrigerator and add remaining whipped topping. Decorate with Vanilla Wafer Cookies and bananas! I crumbled a few cookies too to add some texture. You can get creative and add in toasted coconut on top, or caramel drizzle...  yum! Wait to decorate if you aren't serving right away. You don't want soggy cookies!

 You can see the slices of banana on the bottom when you cut into it. It's sooooo good y'all!


 Took less than 15 minutes to put together! Drool-worthy!

ALLLLL mine!!!


Wednesday, May 10, 2017

Strawberry Pie

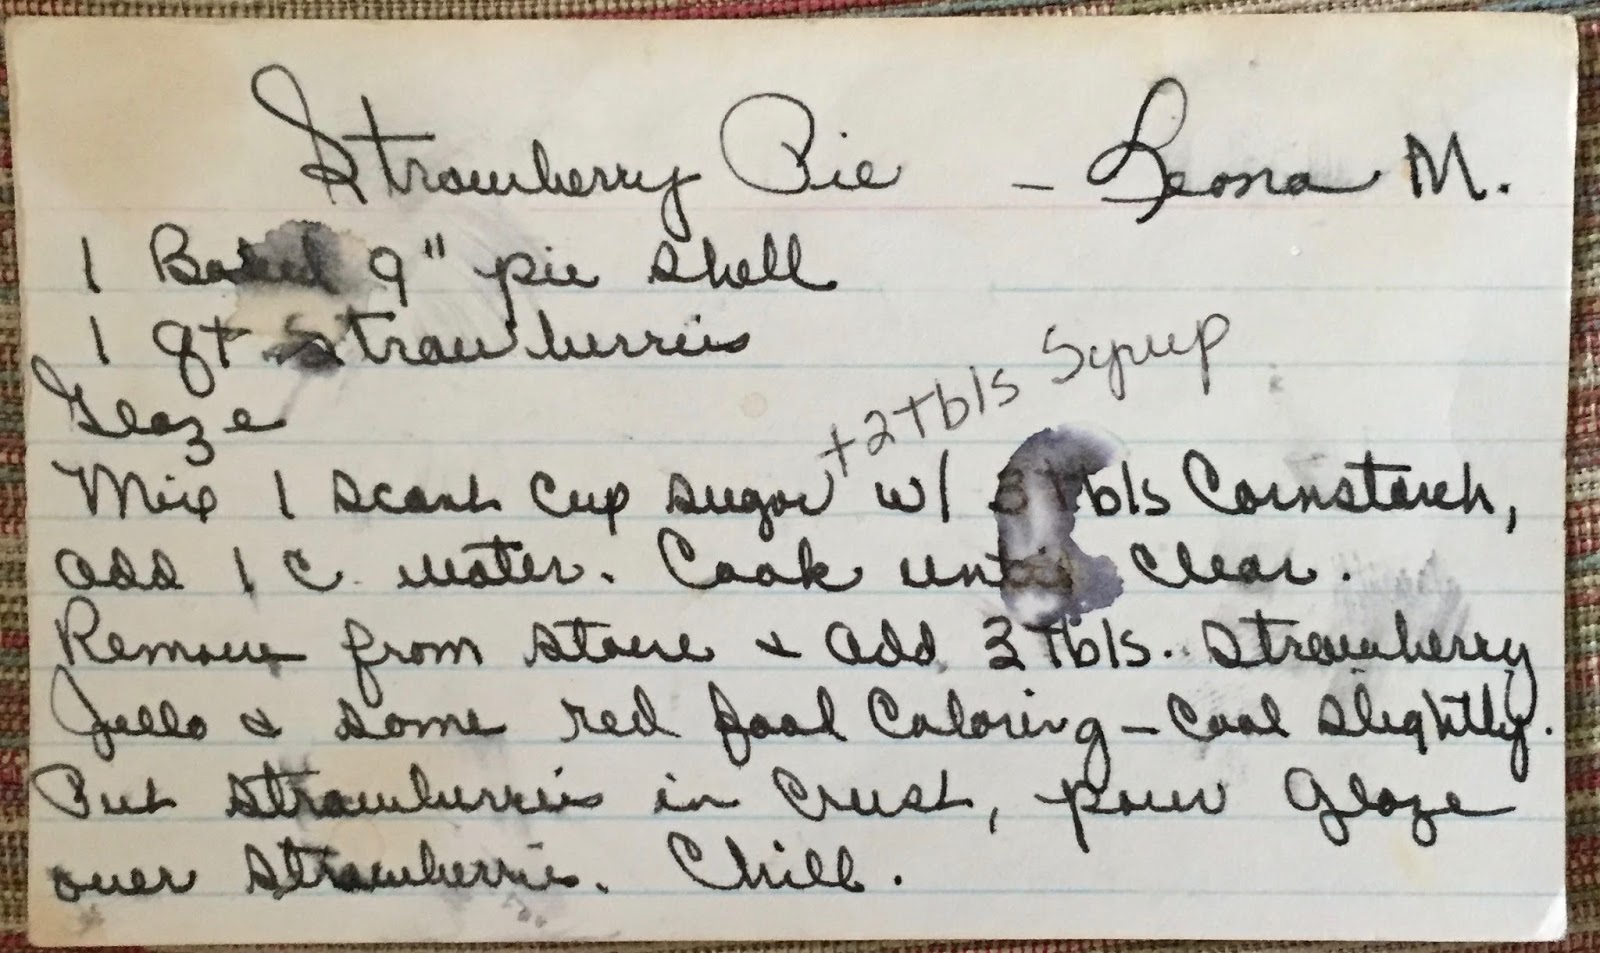
You guys. It's almost summer. The days are getting warmer and warmer, and my cravings for fresh strawberry pie has already hit! I found this recipe in my Grandma Irene's old recipe box. This recipe is from her sister Leona. I LOVE looking at old recipe cards. People spent so much more time making and writing down recipes years ago. When I see an old card, spotty and well-used, I want to make it as soon as I can. That was one of the reason's I wanted to start this blog. I grew up with homemade food often, either from my mom, or my Grandma. It's such a beautiful way of showing people how much you love them.

Look how used this recipe was. Plus my Grandma's writing is so pretty.

Yes. Don't even bother cutting this. Just grab a fork and dig in.
.
.
.
.
.
What You'll Need:
- 1 9" baked pie shell
- 1 to 2 quarts strawberries, washed and dried, diced to your size preference 
GLAZE:
- 1 scant cup sugar
- 2 Tablespoons light corn syrup
- 3 Tablespoons cornstarch
- 1 cup water
- Strawberry Jello

Rinse your strawberries and set them to dry. *Also, I just realized I should dry my fruit on a cooling rack. That way the bottoms get mostly dried, compared to drying them on a cookie sheet where it seems the tops only get dry. Does anyone else do this? I feel like that was probably the best idea I've had in about a year. (Babies will do that to you)

I pre-baked a pretzel crust for this pie. What goes better than sweet strawberries and salty pretzels?? Maybe drenching the top of the pretzel crust with chocolate first... hmm.. definitely going to have to try that next! Anyway, if you do choose to do a pretzel crust, make sure your pretzels are more finely chopped than coarsely chopped. If they are too coarse, it will be harder to cut into slices. Which won't be an issue if you choose to eat this straight from the pan :)

After you've selected the kind of crust you want for your pie, baked it and let it cool (or taken it out of the package, no judgements here!), mix the sugar, corn syrup, cornstarch and water in a saucepan and cook it until the sugar dissolves. Remove from heat and add in the strawberry jello. On the original recipe card, it says to add in red food coloring but I didn't do that, so I'm not sure how the mixture would look with it. Mine was already pretty red so I kept it how it was! 
After you let it cool slightly, you can either put the strawberries in the pie and pour the glaze over them (as the recipe reads) or put them in a separate bowl and let them merry in the glaze for a few minutes. I did the latter. Look how delicious those glazed strawberries look!

Once I let those delicious pieces to merry with the glaze, I scooped them out of the bowl on into my pie shell. I had some remaining glaze left over, so I drizzled some over the top. I didn't want to put too much, in case it made the shell too moist. This probably won't be such an issue if you do a regular pie crust. Regular pie crusts are a bit more durable than pretzel ones. 
Now, this is important. LET IT CHILL. As easy as it would be to dig in right now, let it chill in the fridge for at least an hour.

Top with some homemade whipped topping (heavy cream and sugar and a touch of vanilla) and booyah! I cut these strawberries on the larger side. You can choose how big you want your strawberry pieces. It's so good y'all! The sweet juicy strawberries with the crunch of the salty pretzel crust is insane. This will be a summer staple! 

Wednesday, May 3, 2017

No Bake Pumpkin Pie

Even though it isn't Fall, this is a delicious pumpkin pie! I love that it tastes a little lighter than the normal pumpkin pie. The cream cheese and whipped topping make it feel summery, even though the spices are traditionally used in the Fall! You can definitely go more or less on spices in this pie, and can dress it up as much as you like! I'll show you a simple recipe now, and eventually I will make it more fancy and show y'all what I come up with! 

What you'll need:
- 1 Can (or container) of Pumpkin. Not Pumpkin Pie filling... Make sure the only ingredient 
   is pumpkin
- 1 container of whipped topping, thawed
- 1/2 to 1 cup of powdered sugar (more to taste)
- 1 8oz package of cream cheese, softened
- 1 graham cracker crust
- 1 tsp vanilla
- 1 tsp cinnamon
- 1 tsp cloves
- 1 tsp ginger
- 1 tsp nutmeg (you can increase or decrease the amount of spices to your taste)


You can make your own graham cracker crust... or you can buy it. No judgements here! My mom would tell me to make my own, but lets be real. More times than not I will be buying it pre-made. Although, she is right, homemade always tastes better (mom's know best!) Also, I love Truwhip! It's a healthier version of whipped topping (cool whip) and you can find it right next to the whipped topping in the freezer section. The taste is very similar too, and I can probably eat that whole container.

You'll want to start with a pretty decent sized bowl. It doesn't have to be too big, but something medium sized that will give you enough room to fold in the whipped topping. Or I'm weird and I like extra room with I fold ingredients in.... Anyway, add in about 1/2 to 1 cup powdered sugar. You can really put as much as you want. This will give the pie most of it's sweetness. 1/2 cup won't give it much sweetness (I didn't want it too sweet) and you can go up to 2+ cups if you wanted it really sweet. Your choice!

Next, add it a whole package of cream cheese. Make sure it is softened so it gets creamy and not lumpy. I wasn't too patient... so I just put it in not so softened and it created lumps. Lumps aren't bad, they just don't give an appearance of a smooth filling. Softened is key!

Cream together the powdered sugar and cream cheese until smooth.

Next you'll need to add in your spices. I added about 1 teaspoon of each, but like with the sugar you can add as much or as little as you like! 

Add in your spices and your pumpkin. 

Cream together. Make sure you take a spatula and scrape down the sides, and mix it again. (You'll notice mine is a bit lumpy from the not-so-soft cream cheese. Whoops! Again, make sure your cream cheese is soft :) )

Next, gently fold in your whipped topping. Make sure it is thawed. Frozen whipped topping won't work! You can use a spatula to do this, or I've seen people use a whisk. That's also an option!

After you've folded in the whipped topping, you're mixture will look like this.

Add the filling into your pie crust and chill for at least an hour before serving! (Or in my case, eating to straight out of the pan with a fork while watching Friends :) )

You can get creative with what you put on top of the pie. I wasn't too adventurous this time, so I left it plain. You could add some toasted coconut, or crumbled vanilla wafers. Yum!