Sunday, May 28, 2017

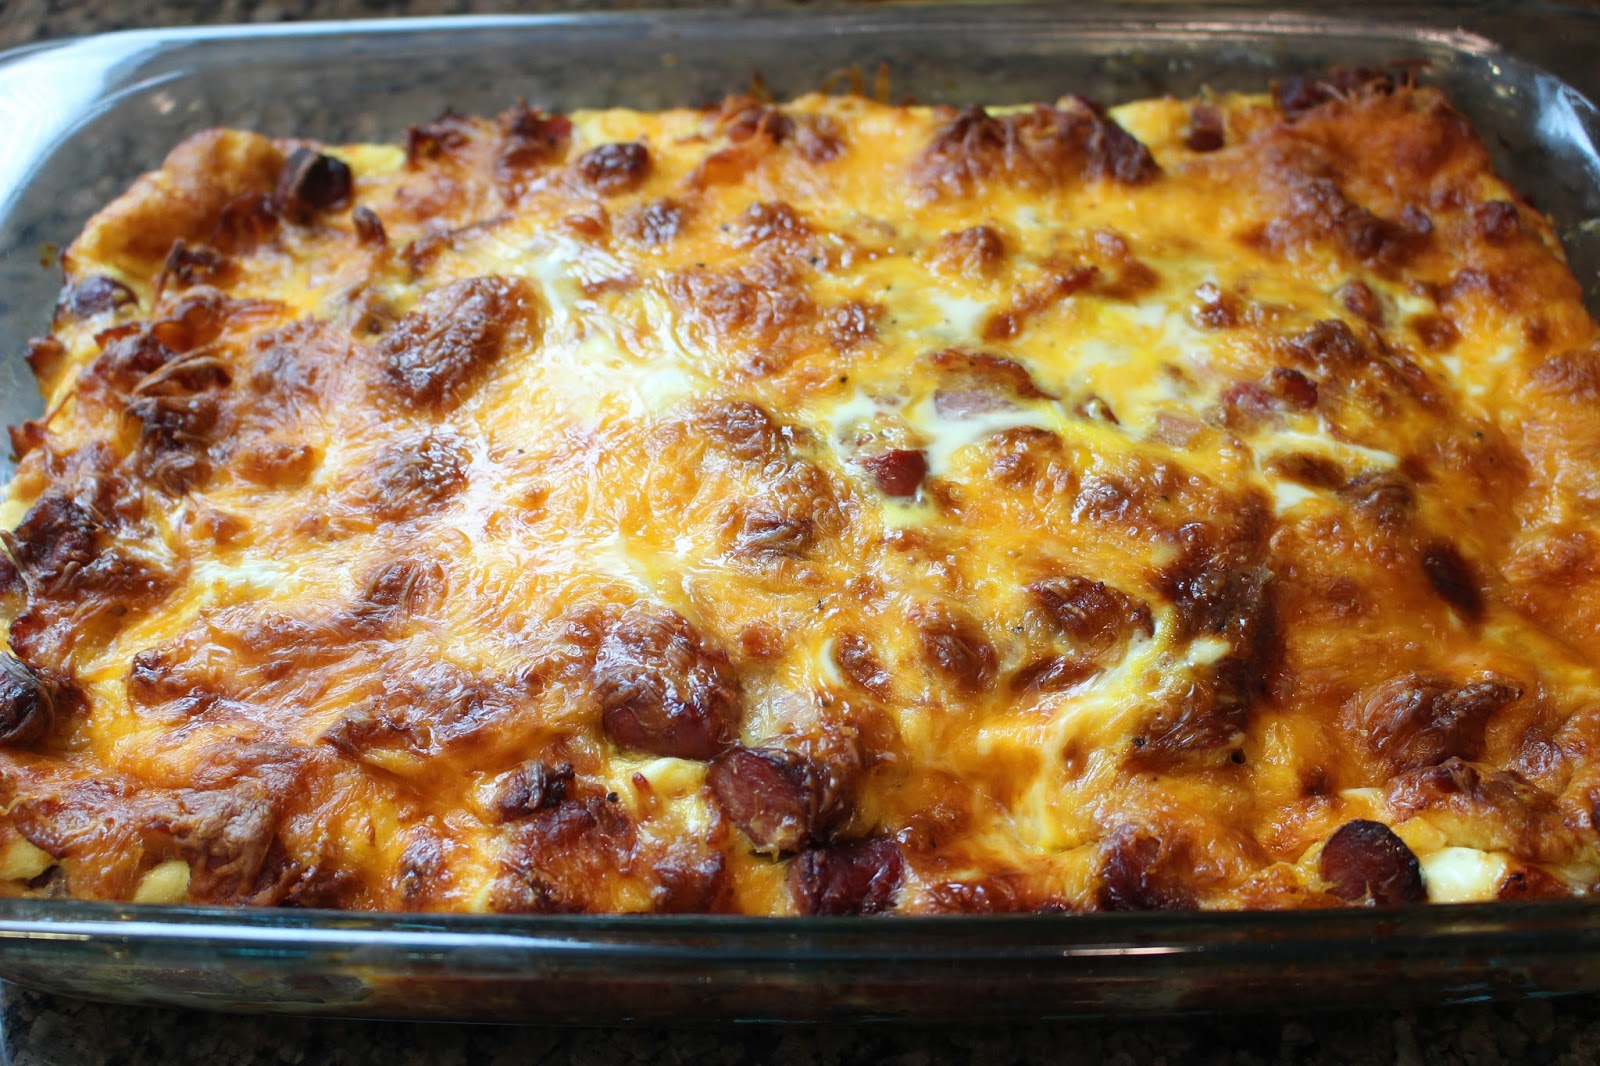
Brunch Egg Casserole

It's almost Memorial Day! A lot of you will be grilling out and enjoying time with family as we remember those who gave up thier lives to protect ours! This would be perfect for a breakfast/brunch option to go with your afternoon of grilling.

This past Mother's Day, my husband's family decided to have brunch. As I was thinking of what I could bring, I came across this recipe for an egg casserole. I needed to prepare something large enough to feed 7 adults, and I thought this was a great option.

I remember when I was little my mom would make an amazing egg casserole with refrigerated biscuits & tons of cheese. Whenever we had guests over, she would make that and I would swoon... and maybe eat half the pan.

This recipe is very forgiving, so you can choose what you would like to put in the casserole. From added veggies, kale, different cheeses... you can get creative! 

*This is an overnight casserole! Get it ready the night before and pop it in the oven when you're ready to bake it the next morning!*


.
.
.
.
.
What You'll Need:
- 7 slices of bread (I used a thicker homestyle bread. The thicker the better)
- 1 pound bacon
- 1 package lil smokies, or diced ham
- 10 eggs, beaten
- 3 1/2 cups milk
- 2 cups cheddar, shredded
- 1 cup jack cheese, shredded

You can add in kale, tomato, spinach, or anything you'd like!

 Slice your bread into cubes

Brown your bacon! 

Dice up your lil smokies! (or ham)

Spread the bread cubes on the bottom of a greased 9x13 pan

Sprinkle on the bacon and lil smokies (or ham). If you want an all veggie egg bake, add in your veggies instead of meats.

Sprinkle the cheese on top of the meat

Beat the 10 eggs in a bowl and season with salt and pepper

Pour eggs over casserole. At this point, you are done for the night! Cover and put in the fridge.

Once you are ready to bake, uncover the casserole and bake at 350* for 30-45 minutes. 

Slice and enjoy! There isn't anything more perfect than baked cheese and eggs. Yum!!

Tuesday, May 23, 2017

Best Crispy Sugar Cookies

These are my all time favorite cookies! They are so simple, and so delicious! 

I remember my Grandma making these all the time. I feel like she always had them available - either in the cookie jar or right on top in her deep freezer (YES these freeze very well!)

I've never been a fan of soft sugar cookies. I'd much rather prefer these. They aren't that glamorous, but you can definitely get creative and frost them or drizzle chocolate on them. I love how simple they look - I don't think you need a lot of decorations on these to know you want to take a big bite into them! 

With that said, my Grandma never glammed these up with toppings, so I didn't in this recipe. I'll add some textures next time I make these, but wanted to give you a base of the best sugar cookie you'll eat!

.
.
.
.
.
What You'll Need:
- 3/4 cup sugar
- 1/2 cup butter
- 1/2 cup shortening (can use butter instead if you wish)
- 1 egg
- 1 tsp vanilla
- 2 cups flour
- 1/2 tsp baking soda
- 1/4 tsp salt

I used shortening since this is what my Grandma's recipe has. I know a few people who will turn their nose because it has shortening in them, so if you don't want to add it, just use 1 cup butter. 

Mix together sugar, butter, shortening, egg, and vanilla until well combined. 

Then, add in flour, baking soda, and salt. Combine until you get cookie dough.

Roll in balls the size of a walnut. I used my Medium Cookie Scoop to measure, then rolled each cookie individually.

Once you have them rolled, you'll want to take a small amount of sugar (about 1/4 cup) and place it in a shallow dish or plate. Take a small glass (with a flat bottom) dip it in the sugar and press down each ball of cookie. (I love my Silpat as you can tell by how used it is! This thing is amazing! I got mine at Sur La Table but you can find them anywhere. I've had mine for about 4 years... and they still work just as well as when I got them - Highly recommend!)

YUM. These are ready for the oven! Bake at 400* for 8-10 minutes. These will get dark fast so keep an eye on them!

Perfection.

Look at these beauties! You can't eat just one, I promise you. 

Store these in a tight fitting container or cookie jar. These can also be frozen to enjoy later! (Mine never last long enough to freeze them, they are so addicting!)


Monday, May 15, 2017

Coconut Water Popsicles

There is nothing better than enjoying a nice, cold popsicle on a summer day! 

I remember when I was little and we would have Root Beer Float popsicles almost every day during the summer! The kind with ice cream in the middle... they were so good!

As much as I would love a Root Beer Float popsicle, I probably should have something a little more healthy :) 


When I lived in Boise, I drank coconut water infused with fruit daily. I thought there had to be a way to enjoy coconut water outside without it getting warm. So, I created coconut water popsicles! Coconut water is so refreshing and it has many health benefits too!

I've done a few creations: Strawberry & Kiwi, Blueberry, and Blackberry Strawberry. My favorite has been Strawberry & Kiwi!

I started with some popsicle molds. I got these from Amazon and have used them a lot! (Especially during my first trimester of pregnancy!)

.
.
.
.
.
What You'll Need:
- Popsicle molds
- 16.9 oz coconut water
- Strawberries, sliced
- Blueberries
- (any fruit you would like to have in your popsicle!)

Start by washing and drying your fruit. Get your popsicle molds ready. If you have some like the one I linked above, put them in their slots without the top on.

Next, put as much fruit in there as you would like. You can go as little or as much as it holds. Or you don't need fruit in there at all, the frozen coconut water by itself is also delicious.

After the fruit is in the molds, shake the coconut water container so the flavor that has settled on the bottom gets distributed evenly. That way, all the popsicles will have coconut flavor (If you don't shake before pouring, some popsicles will have a very faint flavor, and others will have a strong flavor).

Fill each mold up with coconut water. One thing that I've noticed with these molds are if you fill them up too much, it's harder to get the popsicle off the bottom when you are eating them. I fill mine up until just about full, maybe 1/4 inch from the top. 
(You'll use the whole container of coconut water for this)

Once they are filled, place the tops on and freeze overnight. 


When they are frozen, pop them out and enjoy! Preferably by a pool... but anywhere will work :)

Saturday, May 13, 2017

Mother's Day Mango Cake

Tomorrow is Mother's Day, so to treat myself... I made a Mango Cake!!

Anyone that knows me knows my favorite fruit is mango. If mango is an option, I will be getting it.

When we lived in Boise, there was a self-serve wine bar called Bodovino that we would go to. Along with copious amounts of wine to try, they had delicious food. One of my favorites was their Mango Cheesecake. It was silky smooth cheesecake drenched in an amazing mango sauce! Oh I miss that cheesecake! 

So for Mother's Day, I thought I would treat myself to a mango cake. After searching old family recipes, I came across a recipe for Whipped Cream Cake. I needed something moist, but also durable so I thought I would give it a try. It turned out AMAZING.


.
.
.
.
.

What You'll Need:
- 1 cup heavy whipping cream
- 2 eggs
- 1 cup sugar
- 1 teaspoon vanilla
- 1 1/2 cup sifted cake flour*
- 2 teaspoons baking powder
- 1/2 teaspoon salt

FROSTING:
- 1 (8oz) package cream cheese, softened
- 1 stick butter, softened
- 1 cup+ powdered sugar
- 1 mango, diced + a few pieces set aside for topping, if desired

COMPOTE:
- 1 mango, diced
- 1 teaspoon lemon juice
- 1 teaspoon vanilla
- 1/2 cup water, more or less


Ingredients for your cake. 
*If you don't have cake flour, you can make your own. I didn't have cake flour so I searched the web and found an easy solution. For every cup of flour, you'll want to take out 2 Tablespoons and add in 2 Tablespoons of cornstarch. Sift together 5 times, and BOOM. Cake flour. (Since this recipe calls for 1 1/2 cups, I took out 3 Tablespoons and added 3 Tablespoons of cornstarch)

You'll want to whip your whipping cream until stiff peaks. With a stand mixer on high, this should only take about a minute or two. Then you'll want to add in one egg and half the sugar, mix, then add in remaining egg and sugar. Mix again. Once that is mixed, add in the vanilla.

When that is all mixed, you'll want to take your sifted cake flour and fold it in gently. 

BEAUTIFUL!

Cover two cake pans with parchment paper on the bottom, and spray generously with cooking spray so the cakes don't stick. Add in your batter and spread evenly! Bake these bad boys in a 350* oven for about 15 minutes (my oven runs hot... so mine were only in there 13 minutes). Make sure you keep an eye on them! They should be golden brown :) 

Once your cakes are out of the oven, start your compote. Take your diced mango and put it in a pot with vanilla, lemon juice, and water. Let it simmer so the mango juices can thicken and make it SO GOOD.

When your compote is simmering, start making your frosting! (I LOVE cream cheese frosting, but make whichever frosting you want) Take the softened cream cheese and mix it with the softened butter. Once that is mixed, add in about a cup of powdered sugar. You can adjust the sweetness to more or less. I don't like my frosting too sweet, so a cup was enough for me. Some people like it really sweet. If thats you, add closer to 2 cups. 
Once that is all mixed add a dash of vanilla and your diced mango. Give it a good mix!

Check your compote for consistency. It should be thickened, but not super thick. Once it's at your desired consistency, remove from heat and let cool.

Once your compote is cooled, its time to build the layers! Put your compote on top of the bottom layer. Once that is on, cover the compote with some of that delicious mango frosting. Next, pile on the other layer of cake. Frost the cake allllllll over. Get mango everywhere! You can add in the reserved diced mango for garnish on top, or I used the remaining compote for my topping. It was tart next to the sweet frosting... perfect combination! 
My husband doesn't like cake, so I will enjoy this whole. freaking. cake. Happy Mother's Day to me!


Wednesday, May 10, 2017

Strawberry Pie

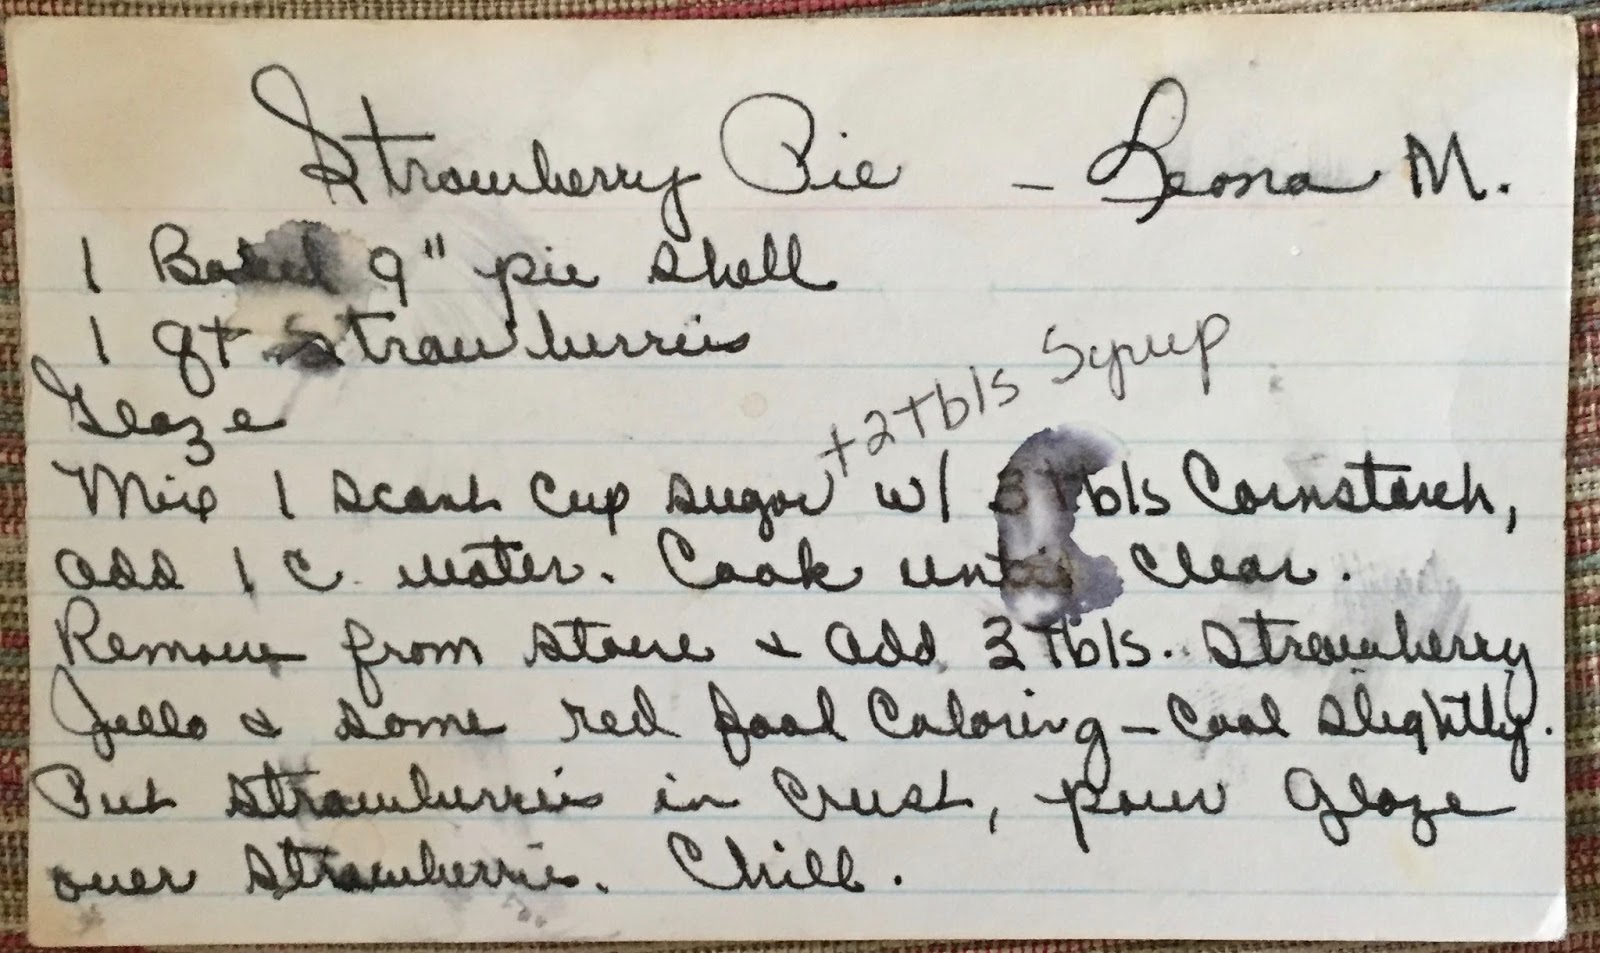
You guys. It's almost summer. The days are getting warmer and warmer, and my cravings for fresh strawberry pie has already hit! I found this recipe in my Grandma Irene's old recipe box. This recipe is from her sister Leona. I LOVE looking at old recipe cards. People spent so much more time making and writing down recipes years ago. When I see an old card, spotty and well-used, I want to make it as soon as I can. That was one of the reason's I wanted to start this blog. I grew up with homemade food often, either from my mom, or my Grandma. It's such a beautiful way of showing people how much you love them.

Look how used this recipe was. Plus my Grandma's writing is so pretty.

Yes. Don't even bother cutting this. Just grab a fork and dig in.
.
.
.
.
.
What You'll Need:
- 1 9" baked pie shell
- 1 to 2 quarts strawberries, washed and dried, diced to your size preference 
GLAZE:
- 1 scant cup sugar
- 2 Tablespoons light corn syrup
- 3 Tablespoons cornstarch
- 1 cup water
- Strawberry Jello

Rinse your strawberries and set them to dry. *Also, I just realized I should dry my fruit on a cooling rack. That way the bottoms get mostly dried, compared to drying them on a cookie sheet where it seems the tops only get dry. Does anyone else do this? I feel like that was probably the best idea I've had in about a year. (Babies will do that to you)

I pre-baked a pretzel crust for this pie. What goes better than sweet strawberries and salty pretzels?? Maybe drenching the top of the pretzel crust with chocolate first... hmm.. definitely going to have to try that next! Anyway, if you do choose to do a pretzel crust, make sure your pretzels are more finely chopped than coarsely chopped. If they are too coarse, it will be harder to cut into slices. Which won't be an issue if you choose to eat this straight from the pan :)

After you've selected the kind of crust you want for your pie, baked it and let it cool (or taken it out of the package, no judgements here!), mix the sugar, corn syrup, cornstarch and water in a saucepan and cook it until the sugar dissolves. Remove from heat and add in the strawberry jello. On the original recipe card, it says to add in red food coloring but I didn't do that, so I'm not sure how the mixture would look with it. Mine was already pretty red so I kept it how it was! 
After you let it cool slightly, you can either put the strawberries in the pie and pour the glaze over them (as the recipe reads) or put them in a separate bowl and let them merry in the glaze for a few minutes. I did the latter. Look how delicious those glazed strawberries look!

Once I let those delicious pieces to merry with the glaze, I scooped them out of the bowl on into my pie shell. I had some remaining glaze left over, so I drizzled some over the top. I didn't want to put too much, in case it made the shell too moist. This probably won't be such an issue if you do a regular pie crust. Regular pie crusts are a bit more durable than pretzel ones. 
Now, this is important. LET IT CHILL. As easy as it would be to dig in right now, let it chill in the fridge for at least an hour.

Top with some homemade whipped topping (heavy cream and sugar and a touch of vanilla) and booyah! I cut these strawberries on the larger side. You can choose how big you want your strawberry pieces. It's so good y'all! The sweet juicy strawberries with the crunch of the salty pretzel crust is insane. This will be a summer staple! 

Cauliflower Salad

We would always have a creamy salad with our suppers growing up. Some of them were warm, some cold. Some had jello :) Most salads had veggies drenched in delicious dressing. This, this is one of those. 
Underneath all that delicious dressing and bacon (YES) there are veggies. I promise.
.
.
.
.
.
What You'll Need:
- 1 head cauliflower
- 1 (10oz) package frozen peas, thawed
- 1 cup chopped celery
- 2 Tablespoons green onion tops
- 1 cup Miracle Whip
- 1 1/2 Tablespoons Ranch dry dressing mix
- 1/4 cup milk
- 3 to 4 slices of bacon, chopped and cooked

Chop the head of cauliflower.

You don't have to do this, but I blanched the cauliflower to cook it slightly. Like, 2 minutes slightly. I have a weird thing about eating raw veggies. Boiling them for 2 minutes has to kill some things, right? RIGHT.

Seriously. Only 2 minutes (if you decide to blanch) After 2 minutes immediately put them in an ice bath. Swirl those babies around so they stop cooking. After a few minutes in the ice bath, you want to really drain them well. I put them in a strainer and place the strainer on top of a bowl so the water doesn't get all over the counter (does that bother anyone else?)

In a separate bowl, mix Miracle Whip, Ranch dry dressing mix, and milk together. If you really like it creamy, add the full cup of Miracle Whip. If you want it lightly creamy, I would only add in 1/2 cup, and about 1/8 cup milk. I love me some creamy salad so I did the full cup. Worth it.

Once you have the dressing mixed, add in the bacon, peas, celery, and onion tops. The salty bacon and crisp cauliflower with pops of sweet peas makes it so delicious. Scoop up a big spoonful. This would be a perfect salad for a picnic or cookout! 

Rhubarb Dream Bars

My Rhubarb plant is in FULL bloom. Or do they say it's ready for harvest? I don't know. But it's HUGE and I could pick some Rhubarb every day for the next few weeks it seems! 

The first recipe I will be baking with my rhubarb is Rhubarb Dream bars. I have never made these before. That always makes me nervous... I don't want to mess it up! But, I need to use up this rhubarb, and since I have a plethora of stalks, I decided to try!

They have a shortbread crust with a custard-like filling. I'm not a huge fan of custard, but the chunks of Rhubarb made it easy to enjoy!

.
.
.
.
.
What You'll Need:
- 2 cups flour
- 3/4 cups powdered sugar
- 1 cup butter
FILLING:
- 4 eggs
- 2 cups sugar
- 1/2 cup flour
- 1/2 salt
- 4 cups rhubarb, diced

My beautiful rhubarb. I cut off the leaves so I could store it in my fridge. I wasn't planning on using it right away, and this way the giant leaves weren't taking up space! *Also, rhubarb leaves are poisonous to dogs. If you have a rhubarb plant, make sure those pups don't eat those leaves! 

This is something my mom taught me. When you prep the rhubarb, trim off the part where the leaf was, and gently take off the stringy parts of the stem. You don't HAVE to do this, it just helps so the rhubarb doesn't get stringy in the bars. *Also, please don't cut your finger doing this. 

First, you want to start with the crust. Combine the flour and powdered sugar in a bowl. Cut the sticks of butter into cubes. 

Place cubed butter in the bowl with flour and powdered sugar. 

Take your pastry cutter and mix all together until you get crumbs.

Once you've made crumbs, press them into a 9x13 pan. Bake at 350* for about 15 minutes, or until it's lightly browned.

When that is baking, you'll want to make your filling. Blend together eggs, flour, sugar, and salt until smooth. 

Once your mixture is well mixed, fold in your rhubarb.

When your crust is lightly browned, pour the filling over it. Bake for another 35-40 minutes (depending on your oven - keep an eye on it!) until the filling is lightly browned. 

Cut the bars once they are cooled and enjoy! As you can see, I let them get a little bit more brown then they should have, but they tasted good! The tart rhubarb with the sweet filling was delicious. The custard-y filling wasn't too custard-y, and this would be delicious warmed up with a big dollop of vanilla ice cream!